sexta-feira, 7 de outubro de 2016

Pedals, Pedal Base and steering linkage - Refurbished


Pinças de travão part 2 - AP Lockheed brake callipers


Estou bastante satisfeito com o resultado final, agora é montar e testar (daqui a uns tempos...esperemos). 
O trabalho em baixo, e referido mais detalhadamente no tópico anterior, foi realizado pela Politech, caso hajam questões ou necessidade de trabalho semelhante.
Consultem aqui: https://www.facebook.com/politechpt/

" I am very happy with the final results, now its time to put them back together, some new parts in and lets pray for the best (hopefully they will last another 40 years...hopefully!)
The work shown bellow and described on the previous entry, was done by Politech, they are on facebook if you have any questions.
Website: https://www.facebook.com/politechpt/ "


sexta-feira, 4 de março de 2016

Pinças de travão part 1 - AP Lockheed brake callipers

 Reparar as pinças de travão:
   Dados técnicos:
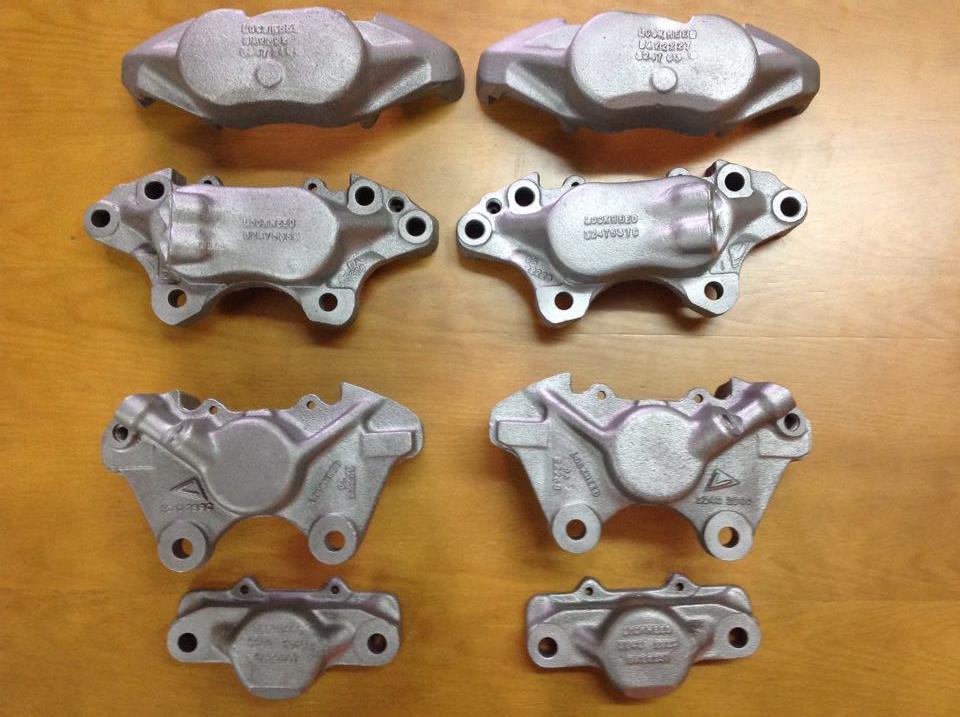
      * lockheed de 4 pistons à frente (ref: 606681 & 606682) imperial thread.
      * lockheed de 2 pistons a trás (ref: 606694 & 606695) imperial thread.

  Material necessário:
      * set de 8 pistons para a frente (ref: 606683)
      * set de 4 pistons para trás (ref: 606696)
      * set de vedantes para a frente e trás (ref: AEU1547 & 8G8587L) 2 de cada.
      * 8 bleed nipples (ref: 606684)

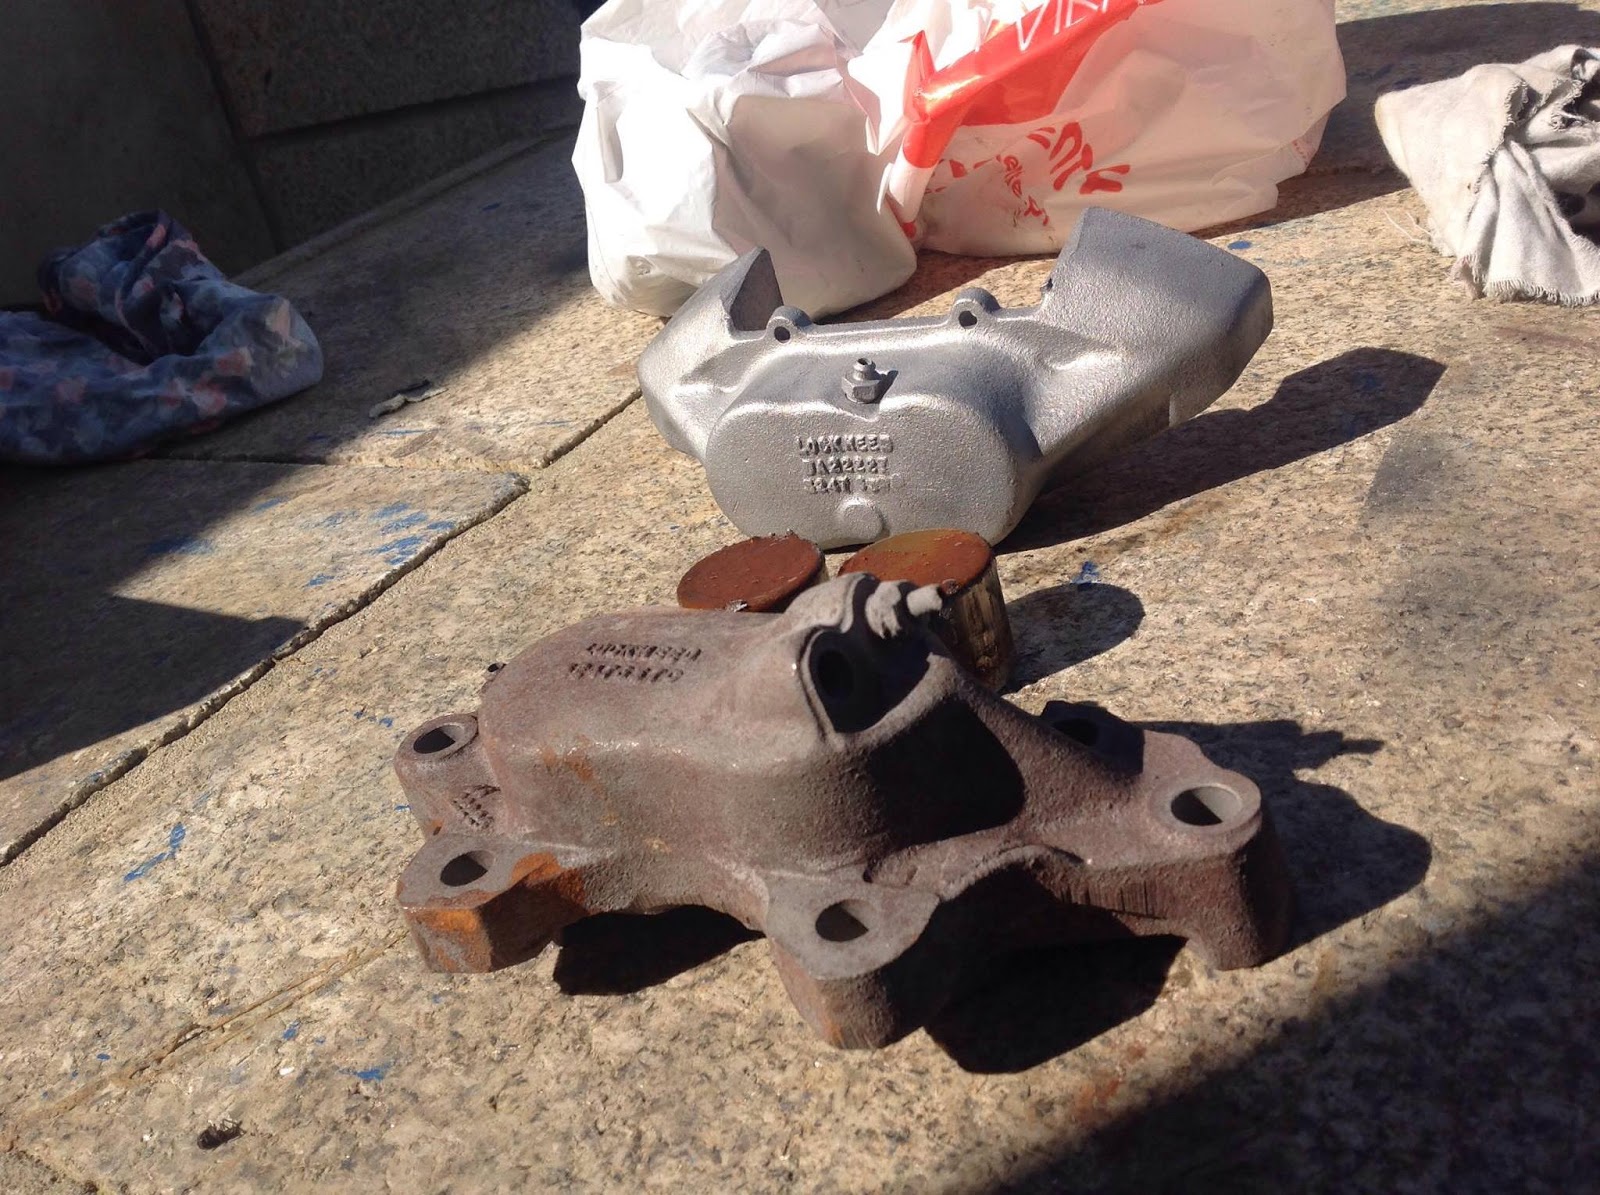
- Inicialmente as 4 pinças foram ao jacto de areia, que não aconselho a ninguém fazer o mesmo, foi feito com base na experiência do mecânico antigo. É um erro, sendo que as pinças são de ferro fundido e têm um tratamento químico específico que se perdeu ao ir ao jacto de areia, juntando ao facto de ficarem picadas, logicamente que o jacto de areia é um processo muito abrasivo e agressivo nos metais.
Vendo o lado positivo, sempre é algo novo que se aprende, mesmo para quem se encarregou deste trabalho e por sorte não foram sem os pistons (se tivessem ido com os pistons muito provavelmente resultaria na perda completa das pinças por picar o interior, onde trabalham os pistons).

- As pinças de travão devem/podem ser limpas por 3 processos:
  * manual, usando escovas de palha de aço etc
  * micro-esferas de vidro (fácil e barato)
  * quimicamente 

Para finalizar, as pinças vão ser novamente limpas (desta vez por micro-esferas) e posteriormente pintadas com tintas VHT, o catálogo está nas fotografias abaixo.
Pensou-se em electro-zincar as pinças mas nunca fica perfeito, assim fica bastante melhor. Aguardemos.


"To repair brake callipers:
   Technical data:
     * 4 piston lockheed callipers at the front (ref: 606681 & 606682) imperial thread.
     * 2 piston lockheed callipers at the back (ref: 606694 & 606695) imperial thread.

  Parts required:
    * 8 pistons for the front callipers (ref: 606683)
    * 4 pistons for the back callipers (ref: 606696)
    * Gasket set front and back  (ref: AEU1547 & 8G8587L) 2 of each.
    * 8 bleed nipples (ref: 606684)

- At first, all 4 callipers were sandblasted, its evidently a mistake and i don't advise anyone to do the same, it was done based on the experience of my former mechanic. Its an error, the callipers are cast iron and have a specific chemical treatment to prevent them from rusting, once you sandblast them, you will loose that treatment and won't have the desired look. Sandblasting is too aggressive.
On the bright side, its good to know more about these sort of things, even for the unprofessional "mechanic", luckily the pistons were still in place and further damage was done.

- Brake callipers can be cleaned using 3 different processes:
   * manually by the use of a brush (etc)
   * glass bead blasting
   * chemical cleaning 

To sum up, my callipers will be cleaned by glass bead blasting and painted with VHT paint, which is highly recommended, you can see the catalog bellow.
Initially we thought about zinc plating but you never get it perfect and won't give you the correct finish and will probably add too much material to the screw threads. Anyway, lets see what we get."


quinta-feira, 3 de março de 2016

Engine Rebuild - Rover V8 heads

Fui buscar as cabeças do Rover V8, confesso que ao início estava um pouco receoso com o estado geral do motor e dos eventuais danos que poderia encontrar.
As cabeças foram testadas rigorosamente, estão as duas boas e apenas tinham um ligeiro empeno. Foram rectificadas, válvulas rodadas, limpas dentro e fora através do uso de ultra-sons, como se pode ver, o resultado final é bastante satisfatório. Fiquei muito contente por não ser necessário substituir válvulas nem guias, estava tudo OK.

Já tenho os 8 vedantes novos para as válvulas de admissão e apesar das relas estarem aparentemente boas, vou mudar todas claro, num restauro nunca se pode facilitar. 
Só tenho que agradecer à Ideal do Trancão, que fez um excelente trabalho a um preço muito em conta, só tenho que aplaudir o profissionalismo e amabilidade.

Passando ao bloco em si, o último piston que estava colado já saiu, já tenho o bloco nu e pronto para ser tratado e eventualmente, reconstruído. Em breve terei mais novidades, até lá...keep calm and range rover on.

"Picked up my Rover V8 heads, i must confess i was afraid of the overall condition of the engine and the damage i could find.
The heads were thoroughly tested and they are both very good, only had a slight warpage.
They were skinned, valves checked, cleaned inside out with the use of ultrasound cleaning, as you can see, the outcome is very satisfying. I was really happy that i didn't have to swap valves and guides, all was OK.

I have now all 8 valve seals,  and even though the water plugs are good and were tested, i believe i will swap them all, you can never be too sure.
I would like to thank the lads of "Ideal do Trancão" for their excellent work at a very fair price, i applaud the professionalism and kindness.

On to the block itself, the last piston was removed after long hours of struggle, i have now a bare block ready to be tested and refurbished. I will have more news soon, till then...Keep calm and Range Rover on."


sexta-feira, 5 de fevereiro de 2016

Engine rebuild - part 1

Bom,

Como sabem, chegou a altura de tratar da mecânica, algo que me interessa muito e que tenho vindo a adiar já há uns tempos, mas a situação mudou o que permitiu que finalmente pudesse enveredar pela parte que mais gosto.

Abrir o motor Rover V8 é bastante simples, como o motor de base americana que é, nada como desapertar meia dúzia de parafusos para ter acesso ao interior do motor. Até aqui tudo bem, até porque já tinha retirado a admissão, o escape e os restante periféricos (distribuidor e alternador).

Como referi antes, o motor tem 72 mil kms, está parado há pelo menos 20 anos, trabalhava com os 8 pistons e não estava colado, até aqui tudo bem, a perspectiva era positiva, trata de retirar as cabeças e ver em que pé estamos.

"Well,

As you know, its time to start dealing with the mechanical bits, an area i have great interest in, and been avoiding for awhile now. The situation has changed, which allowed to finally deal with the part i like so much.

Taking apart the Rover V8 engine is quite simple, as true american engine, nothing like unbolting a couple of bits and bobs, to have full access to the engine´s internals. So far so good, i took the inlet manifold, exhaust etc awhile go which makes it even easier.

As i said before, the engine has 40.000 miles on the clock, been stood for 20 years +, ran with all 8 cylinders and wasn't seized, looks promising, the head bolts are off....and lets see where we stand."


Como podem ver, não é promissor.
Nunca devem pôr um motor que se encontra parado há muitos anos a trabalhar, aprendam com o meu erro e ouçam o que vos dizem, é um erro enorme com consequências gravíssimas.
Estavam 2 litros de água no cárter, e a massa que vêm no filtro não é positiva.
A reparação vai ser demorada e muito dispendiosa, para um motor com 72 mil kms que supostamente estava bom.

À partida, tudo indica que vai levar 8 camisas novas, segmentos, bronzes, capas de biela, árvore de cames, touches e quem sabe, pistons.

"As you can see, its not looking promising.
You never should start an engine that has been stood for a long number of years, the consequences can be severe, learn from my mistake.
There was half a gallon of water in the sump, the goo you see on the filter is not good.
The repairs will be take time and money, for an engine that has 40k miles and was supposedly good.

It will probably need 8 new liners, pistons rings, big end shells, camshaft and who knows, maybe even pistons."